
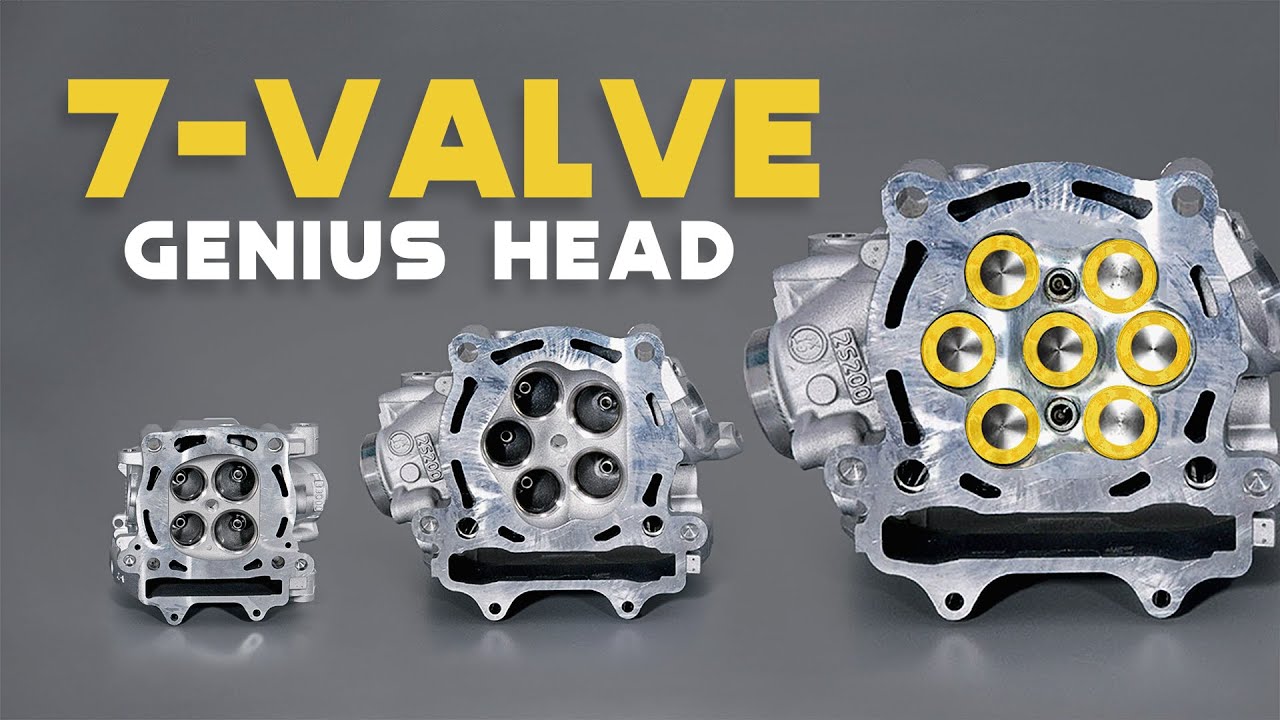
Okay, so I’ve been messing around with motorcycle engines for a while now, and I recently got my hands on something pretty unique – a Yamaha 7-valve head. Yeah, you heard that right, seven valves per cylinder! I’d heard whispers about these things, but actually seeing one in person was wild. I figured I’d share my experience tinkering with it, ’cause why not?
Getting Started
First things first, I needed to get this thing on my workbench. It wasn’t exactly easy to find, let me tell you. After weeks of searching online forums and calling up some old biker buddies, I finally tracked one down. The guy I bought it from said it was pulled from some super rare racing bike, but who knows how true that is. Either way, I was stoked.
Once I got it home, I gave it a good once-over. It was definitely used, a little greasy, but nothing too scary. The sheer complexity of it was immediately apparent, though. All those extra valves packed in there…it’s a tight squeeze!
Digging In
I started by carefully taking it apart. My usual tools felt almost inadequate for this thing. I had to be extra gentle, making sure I didn’t strip any bolts or damage any of those tiny valve springs. I took tons of pictures as I went, just in case I forgot where everything went (which, let’s be honest, is pretty likely with me).
- Valve Removal: Getting the valves out was a real pain. They were so small and tightly packed, I nearly lost a couple. I ended up using a magnet and a lot of patience.
- Cleaning Time: Once I got the major components separated, I gave everything a thorough cleaning. Years of grime and who-knows-what-else had built up. Good ol’ degreaser and some elbow grease did the trick.
- Inspection: With everything clean, I could finally get a good look at the individual parts. I checked for any cracks, wear, or anything else that looked out of place. Surprisingly, everything seemed to be in pretty good shape, considering its age.
Putting It Back Together (The Real Challenge)
Reassembly was where things got really interesting. It was like a 3D puzzle, but with much higher stakes. I slowly worked my way backward, referring to my photos constantly. I’m pretty sure I spent more time looking at pictures than actually turning wrenches.
The trickiest part, by far, was getting the valve timing right. With seven valves per cylinder, there’s a lot more to keep track of. I had to triple-check everything, making sure all the gears and chains were lined up perfectly. One wrong move, and you could end up with a very expensive paperweight.

The Moment of Truth
After hours of painstaking work, I finally got it all back together. I’ll admit, I was a little nervous to actually try and run it. But, I hooked it up, said a little prayer, and gave it a crank.
And… it fired up! It sounded… different. Definitely a unique roar. I haven’t had a chance to really push it yet, but just getting it running was a huge win. It was rough at first, but after it has been running for a while, it began to run perfectly. I still have a bunch to fine-tune, for sure, but to have it run is amazing!
This whole project was a real learning experience. It pushed my skills to the limit, and I definitely learned a few new curse words along the way. But seeing that 7-valve head come to life made it all worth it. Now, I just need to figure out what bike to put it on… that’s a problem for another day!