
Okay, so let’s talk about figuring out your motorcycle helmet size. It sounds simple, right? But man, I remember getting it wrong early on, and it was a real pain, literally.

My first helmet? I pretty much guessed. Walked into a shop, saw one I liked the look of, and the label said ‘Large’. I’m a reasonably big guy, thought ‘Large’ sounded about right. Wore it for a few rides, and yeah, it felt okay-ish at first, but after an hour or so, I’d get this nagging headache right on my forehead. Plus, on the highway, it felt like it was trying to lift off my head sometimes. Not exactly confidence-inspiring.
That’s when I realized I needed to actually figure this out properly. No more guesswork. So, here’s what I actually did, step-by-step:
Finding My Measurement
- Got a Measuring Tape: First thing, I grabbed one of those soft, flexible tailor’s measuring tapes. The kind you use for sewing. A regular stiff tape measure won’t work well here.
- Measured My Head: This felt a bit silly, standing in front of the mirror, but it’s crucial. I wrapped the tape around the widest part of my head. For me, that was about an inch above my eyebrows and ears. You want to measure the circumference. I made sure the tape was level all the way around, not tilted.
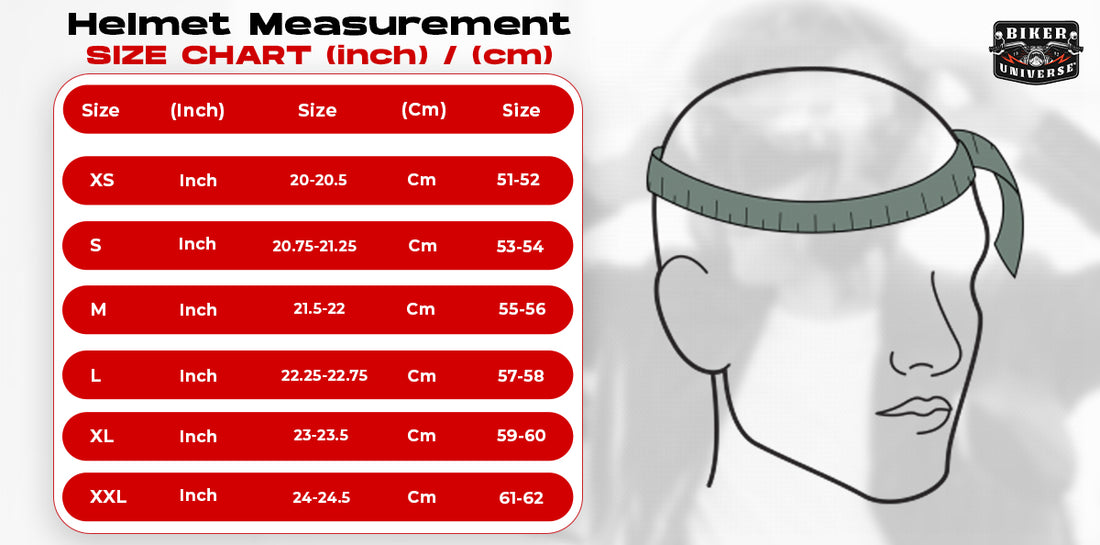
- Took the Measurement Several Times: Just to be sure, I measured it like three times. Wrote down the number in inches and centimeters, because different brands use different units on their charts. My measurement came out consistently around 59 cm.
Using the Size Chart
Armed with my 59 cm measurement, I started looking at helmet brand size charts online. This was eye-opening. See, one brand’s ‘Large’ might cover 59-60 cm, while another brand’s ‘Large’ could be 58-59 cm, and their ‘XL’ might start at 60 cm. They are not all the same! This explained why my first ‘Large’ felt off – it was probably the wrong ‘Large’ for my specific head shape and that particular brand.
So, I looked up the charts for a few brands I was interested in. Based on my 59 cm, I fell mostly into the ‘Large’ category for the brands I liked, but sometimes I was right on the edge between ‘Medium’ and ‘Large’, or ‘Large’ and ‘XL’.
Trying Them On (The Most Important Part)
The measurement and chart give you a starting point, but nothing beats actually trying helmets on. I went back to a store, this time knowing I was probably a ‘Large’ but possibly needed to try alternatives.
- How it Should Feel: I put on a ‘Large’ from the brand I was eyeing. It felt snug. Really snug. All around my head – cheeks, forehead, back. Not painfully tight, but definitely firm. My cheeks were pushed up a bit, kind of like a chipmunk, which I read is actually a good sign when the helmet is new because the pads will break in slightly.
- Checking for Pressure Points: I kept it on for a good 10-15 minutes, just walking around the store. I was specifically feeling for any spots that felt like they were pressing way harder than others, especially on the forehead (remembering my old headache issue). This new one felt evenly snug.
- The Roll Test: With the strap fastened securely (always fasten the strap!), I tried to roll the helmet forward off my head by pushing up from the back base. It stayed put. I tried pulling it side to side; it moved a little, but mostly my skin moved with it, it didn’t shift independently on my head. That felt right.
I actually tried on a Medium too, just to see. Couldn’t even get it on comfortably. Tried an XL, and it felt a bit loose, like it might shift if I shook my head hard. So, the snug ‘Large’ was definitely the one for that brand.
So yeah, that’s the process I went through. Measure your head properly, check the specific brand’s size chart, and then absolutely try the helmet on, wear it for a bit, and check the fit. Don’t just grab one off the shelf based on looks or a generic size label. Getting the right fit made a huge difference in comfort and feeling secure on the road. Took a bit of effort, but totally worth it.